
2
 Facebook Groups are places where you get to know people all around the World. Even you too might be added to groups and getting notifications from it. Well, If you are added to a large group, you may be receiving a notification whenever someone posts in it. Well, I am added to more then 50 groups, So receiving notifications from all of them is a very difficult thing to manage!!! As it will give me a lot of notifications everyday. So, I have found the solution to get rid of these notifications. However, there is an option available to disable the notifications from the group.

So, you got rid of the Facebook Notifications!!!
Well, you can revert back the settings and make it ON to receive group notifications!!
So, I hope you find my article useful!!
Kindly share your views via comments on "How to disable Notifications from any Facebook Group"!!!
 Read More
How to disable Notifications from any Facebook Group

Steps to disable Notifications from any Facebook Group:
- Login into your Facebook Account.
- Go to the group from which you want to disable Group Notifications.
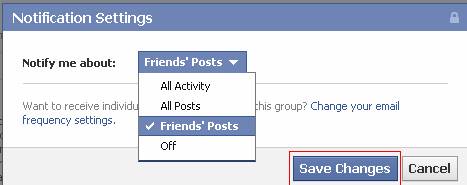
- At the top right corner, you will find a Notifications button!!! Click on it and from the drop-down menu, Click on the OFF button. Now you will no longer receive notifications from that group.
- You can even configure group notifications manually using the Settings Button. Here you can select the activities of that groups for which you want to receive notifications like All posts,friends posts,etc.!!
- Make your desired changes and click on Save Changes button.
So, you got rid of the Facebook Notifications!!!
Well, you can revert back the settings and make it ON to receive group notifications!!
So, I hope you find my article useful!!
Kindly share your views via comments on "How to disable Notifications from any Facebook Group"!!!
Read More
0


Why Ftalk!!!
Ftalk is the best third party chat tool application for Windows. It comes with the following features:-
It has cool emoticons.
You can even update your status using this app.
No need to open Facebook.
Get notified when friends come online.
Faster and more Stable then Facebook.
Nice Interface.
So, Enjoy using this awesome Facebook Chat client!
Read More
Facebook Chat client for Windows Download
Are you a real Facebook Addict??? You really like to online for 24 hours,,,,, then I have an amazing application for you!!! Well, you like to chat with all your friends!!! Then you must have this amazing utility i.e FTalk!!! If you want to chat with all your friends, then a desktop client is a must need to stay online right from when your computer starts!!! I grabbed the best Facebook Chat Client to provide you a awesome Chat Experience!!!
Why Ftalk!!!
Ftalk is the best third party chat tool application for Windows. It comes with the following features:-
It has cool emoticons.
You can even update your status using this app.
No need to open Facebook.
Get notified when friends come online.
Faster and more Stable then Facebook.
Nice Interface.
Easy to use.
So, it has nice features. No doubt, you can give one chance to this lightweight Facebook Chat Client.
DOWNLOAD FTALK HERE
So, it has nice features. No doubt, you can give one chance to this lightweight Facebook Chat Client.
DOWNLOAD FTALK HERE
So, Enjoy using this awesome Facebook Chat client!
Read More
3
![]() "Appearing offline to some of your friends on Facebook Chat" might happen in any case when you fought with him/her or you want to chat with one or two people only and do not want to be distracted by others messages. If you want to appear offline to those "NO TO CHAT" people in any case, then facebook has a nice feature which enables you to choose with whom you do not want to chat.
"Appearing offline to some of your friends on Facebook Chat" might happen in any case when you fought with him/her or you want to chat with one or two people only and do not want to be distracted by others messages. If you want to appear offline to those "NO TO CHAT" people in any case, then facebook has a nice feature which enables you to choose with whom you do not want to chat.
Well, if you are having a lot people in your friend list and would like to chat only with a few real friends and do not want to be distracted by others, this trick may help you in such a case.
Well, you might be aware of the offline/online feature that comes to be offline/online to everyone. So, let us go further.
Steps to Appear Offline to Some of your friends on Facebook:-
(1) Firstly Login into your Facebook Account.
(2) On the homepage, at the left side, Locate Lists and Click on More.

(3) On the next page, Click on Create a list button and give your list a desired name.

(4) You will be redirected to the next page where you will be asked to add friends.
Note: Add only those friends with whom you want to appear online to chat.
You will be able to add friends to the list from the right side of your page.
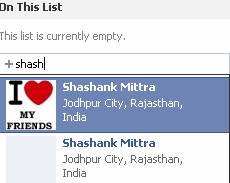
(5) When you are done by adding all your friends to the list with whom you want chat and appear online, Go back to your chat sidebar, and click on the settings button and then click on Limit Availability...
(6) Then SelectOnly make me available toand mark the group you just created and Click on OK. That's all.

This makes you appear online to only those friends to which you selected.
So, I hope u liked my article!!
Kindly share your views on "Appear Offline to Some of Your Friends on Facebook Chat"!!!
Read More
How to Appear Online to Some of Your Friends on Facebook Chat

Well, if you are having a lot people in your friend list and would like to chat only with a few real friends and do not want to be distracted by others, this trick may help you in such a case.
Well, you might be aware of the offline/online feature that comes to be offline/online to everyone. So, let us go further.
Steps to Appear Offline to Some of your friends on Facebook:-
(1) Firstly Login into your Facebook Account.
(2) On the homepage, at the left side, Locate Lists and Click on More.
(3) On the next page, Click on Create a list button and give your list a desired name.
(4) You will be redirected to the next page where you will be asked to add friends.
Note: Add only those friends with whom you want to appear online to chat.
You will be able to add friends to the list from the right side of your page.
(5) When you are done by adding all your friends to the list with whom you want chat and appear online, Go back to your chat sidebar, and click on the settings button and then click on Limit Availability...

(6) Then SelectOnly make me available toand mark the group you just created and Click on OK. That's all.
This makes you appear online to only those friends to which you selected.
So, I hope u liked my article!!
Kindly share your views on "Appear Offline to Some of Your Friends on Facebook Chat"!!!
Read More
2


(2) Turn on Login Notifications
It is a very major high level security feature. By enabling this feature, whenever then anyone logins in your Account, you will receive a notification to your Mobile and Email.
As such, if anyone logins into your Account with any unknown device, you can easily Identify.
(3) Trusted Friends
Choose 3-5 trusted friends. If, in any case, you loose your account, This will help you to again retrieve it.
(4) Recognised devices and Active Sessions.
This helps you to verify Recognised devices and recent Active Sessions. You can only take it in use if you have been using Login Notifications. It will ask name of the device whenever you login into your Facebook Account. A box will appear asking you to name that particular device as shown below.You can give it any name according to yur choice like home,school,cafe,etc.

If you click on Recognised devices in the security tab, you will see the list of all your devices.
If you want to know the recent device with which your Accounts have been logged in yet, then Click on Active Sessions tab to know the recent activity. If you see any suspicious device logged in with your Account, then just end that session by clicking on End activity.
(5) Hide your Email
This is the last point and one of the most important point. You can hide your Email by going to your Privacy settings. So, do not forget to hide your Email ID.
So, I hope these tips will help you to protect your Facebook Account.
Please share our posts.
Keep Visiting!!!
Read More
Maximize your Facebook Account Protection

Hii Friends...I hope you all are fine. As we all know that, there are many hackers sitting around who can break into our Facebook Account. As such, it is necessary for us to give the maximum security to our Facebook Account as these accounts are very Important to us as they are linked with our personal as well as commercial life. Facebook Accounts are very secure but due to our poor Knowledge towards System Security, we may loose our Accounts. In this series, I am going to provide you all the possible settings that will help you to secure your Facebook Account.
Facebook comes with various security features that will help you to give maximum security to your Facebook Account. So, In order to give security to your Account, you must activate these features.
Follow the below Steps to give Maximum Security to your Facebook Account:-
Go to Account Settings.
Follow the below Steps to give Maximum Security to your Facebook Account:-
Go to Account Settings.
Now choose Security Tab.
(1) Enable Secure Browsing
Always make sure that you are using secure browsing. It will help you to be safe from various attacks around the Internet.
In the security tab, the first option is secure browsing.
Account settings<Security<Secure Browsing<Edit<Enable Secure Browsing.
Always make sure that you are using secure browsing. It will help you to be safe from various attacks around the Internet.
In the security tab, the first option is secure browsing.
Account settings<Security<Secure Browsing<Edit<Enable Secure Browsing.
Just see below how secure browsing looks like!!!!
(2) Turn on Login Notifications
It is a very major high level security feature. By enabling this feature, whenever then anyone logins in your Account, you will receive a notification to your Mobile and Email.
As such, if anyone logins into your Account with any unknown device, you can easily Identify.
(3) Trusted Friends
Choose 3-5 trusted friends. If, in any case, you loose your account, This will help you to again retrieve it.
(4) Recognised devices and Active Sessions.
This helps you to verify Recognised devices and recent Active Sessions. You can only take it in use if you have been using Login Notifications. It will ask name of the device whenever you login into your Facebook Account. A box will appear asking you to name that particular device as shown below.You can give it any name according to yur choice like home,school,cafe,etc.

If you click on Recognised devices in the security tab, you will see the list of all your devices.
If you want to know the recent device with which your Accounts have been logged in yet, then Click on Active Sessions tab to know the recent activity. If you see any suspicious device logged in with your Account, then just end that session by clicking on End activity.
(5) Hide your Email
This is the last point and one of the most important point. You can hide your Email by going to your Privacy settings. So, do not forget to hide your Email ID.
So, I hope these tips will help you to protect your Facebook Account.
Please share our posts.
Keep Visiting!!!
Read More
0
 Hii Friends....I hope you all are fine. As we know that Facebook comes with anonymous features, and there are various features of it that we are not aware of!!! One of them is Group Chat, One might not be aware of it, but it is one of the most awaited feature on Facebook. Actually,this group feature allows you to chat with multiple friends from a single Chat Box.It allows you to add multiple friends to chat. It is easy to configure and much easy to use.
Steps to do group chat in Facebook:-


Read More
How to do group chat with friends in Facebook
Steps to do group chat in Facebook:-
- Login into your Facebook Account.
- Now open the chat box of any online friend with whom you want to chat.
- After that click on the Gears icon present at the top of the chat box and Click on Add Friends to Chat.

- Now you will see a box to enter the friends names. Just enter the names of the friends to whom you want to add to the group chat.
- Click done and enjoy chatting with multiple friends!!!
So,I hope you enjoyed my article!!!
Please do comments on this post!!!
Keep Visiting!!!
Please do comments on this post!!!
Keep Visiting!!!
Read More
0


Read More
Trick to disable Facebook Email Notification
Hii Friends....I hope you all are fine. As we all know that Facebook is the most popular social Networking Site. Today am sharing a very useful trick to Disable Facebook Email Notification. Our Facebook Accounts are linked up with our Email Accounts like Gmail,Yahoo,etc. As such if we get any notification on our Facebook Account, the same Notification we will receive as an Mail on our Email Address. As such, If we sometimes bother to open our Email Accounts then we see our Inbox full on Facebook Notifications which sucks. So, In this series we will tell you about how to stop receiving Facebook Email Notifications via Email.
Steps to Disable Facebook Email Notification:-
Steps to Disable Facebook Email Notification:-
- Login into your Facebook Account and Go to Account Settings.
- Choose notifications button from the right side of the left side column.
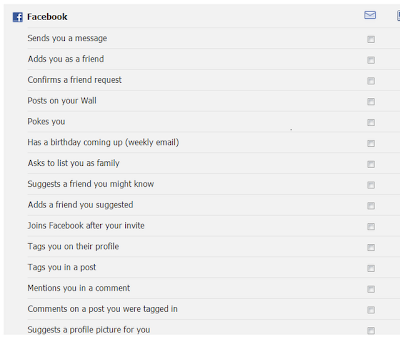
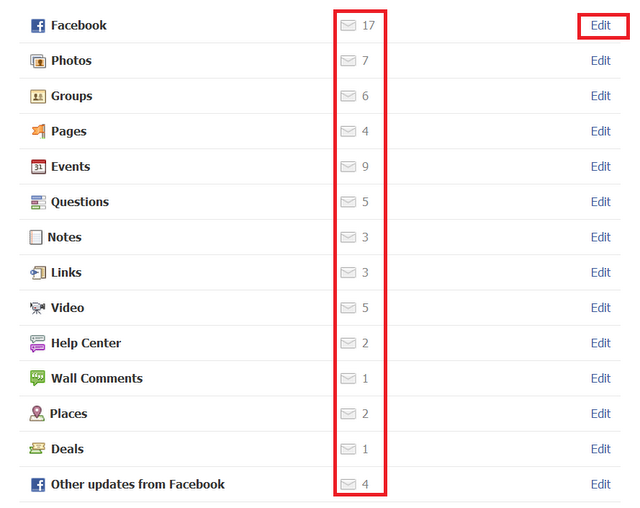
- You can see various kinds of notifications under various categories, you can uncheck them all, or you can keep some some fields checked (depending upon you) according to you need. If you uncheck them all then you will not again receive Email notifications from Facebook.

- After you uncheck all the fields, you will see something like below.

- Now save it!!!
- You are done!!!
Now you will no longer receive Facebook Notifications via Email.
So, I hope you have enjoyed my article!!
Please do comments on this post!!
Keep Visiting!!!
So, I hope you have enjoyed my article!!
Please do comments on this post!!
Keep Visiting!!!
Read More
2
 Hii Friends.....I hope you all are fine. Today am going to share a Facebook Trick that will amaze all your friends. You can flip the text of your Status or your Comment using this trick and amaze your friends. You can do it all easily using an online utility that is Flipping Text. You will receive very nice comments from your friends.
Read More
Trick to Flip the Text of your Facebook Status or Comment
Steps to Flip your Facebook Status or comment:-

Now just copy the lower text and update it as your status or you can also comment. Your friends will get amazed for sure.
So,I hope you have enjoyed my article!!!
Please do comments on this post!!
Keep Visiting!!!
- Firstly Go to this site - http://www.fliptext.org/
- In the top box, type the text that you want to flip and click on Flip Text.
- In the lower field, you will see your text is flipped.
Now just copy the lower text and update it as your status or you can also comment. Your friends will get amazed for sure.
So,I hope you have enjoyed my article!!!
Please do comments on this post!!
Keep Visiting!!!
Read More
1
 Hi Friends.....I hope you all are fine. After the introduction of Google+, Facebook has been engaged in hard efforts to attract more Internet users by bringing out new interfaces like Video Calling,Chat Sidebar,New Profile layout,etc. Now Facebook Launched a new feature called timeline. This timeline feature will help all facebook users to have a more attractive profile. Currently it is only available for Facebook Developers but you can also enable it in your profile using Facebook Developers App.


Yippee!! You have done it all!! Now you can see awesome looks on your profile!!!! There are many amazing features on this Facebook Timeline!!!
You will have a Profile look just as shown below!!!

Read More
Trick to Enable Timeline Feature on Facebook
Some Features of Facebook Timeline:-
- Facebook Timeline will provide you an interactive way of presentation to your profile and give it dashing looks.
- It will show all your oldest status updates as well as all your pictures on a single page since you created your account. So searching pictures and status have been made much easy for users.
- You can even set a profile cover page along with your profile picture.All your details like Personal Information,Updates,News feed,etc. can be viewed from a single page.
And there are many more features then these.
Steps to enable Timeline Feature on your Facebook Account:-
- Firstly login into your Facebook Account if you are not logged in.
- Now Go to Facebook Developers Apps Page.
- Select Create a New App present at the top right corner of the page.

- Now you will be redirected to a new page. It will ask you for App Display name and App Namespace Name, (Give anything of your choice but that should be available). Check Mark on I agree box. And Click on Continue.
- In the next page, it will ask you to enter the Captcha code. Enter the Correct Captcha Code and Click on Submit Button.
- Now it will show all your details , let them remain unchanged and click on save changes button present at the bottom..
- Now click on Open Graph button present at the left side of the page.
- Now you will be redirected to Getting started page. Here you have to enter any function. Here I have entered "Read tricks". You may enter any thing and hit on Get Started.
- Now you will be redirected to the configuration pages. You will go through three editing pages. No need to make any changes in them. Just go through them and let them remain unchanged. Just click on Save Changes and Next button present at the bottom for three times.
- Now wait for two-three minutes and then to your Facebook homepage. You will see an an invitation from Facebook on the top of your profile as shown below.
- Just click on Get it now.
Yippee!! You have done it all!! Now you can see awesome looks on your profile!!!! There are many amazing features on this Facebook Timeline!!!
You will have a Profile look just as shown below!!!
I hope you have enjoyed my article!!!
Please do comments on this post!!
Keep Visiting!!!
Please do comments on this post!!
Keep Visiting!!!
Read More
2
 Hii Friends..... I hope you all are fine. As we all know that Facebook plays an important part in our lives. And mostly people are addicted to Facebook. Well, Facebook has been bringing out many awesome changes in it to make it more attractive. Facebook includes various helpful features. Though,there is something missing that is Facebook does not provide any notification if someone unfriend us. So, Today am going to tell you how can you know that who unfriended you on Facebook.
Read More...
Well,this is the most easiest method to check who unfriended you on Facebook. So, Follow the given steps to perform this trick:-

Using this, you only know your daily,weekly or monthly unfriends. You cannot view the unfriends that are older then one month.
So, I hope you have enjoyed my article!!!!!
Please do comments on this post!!!!
Keep Visiting!!!!
Read More
Trick to check who unfriended you on Facebook!!!!

Read More...
Well,this is the most easiest method to check who unfriended you on Facebook. So, Follow the given steps to perform this trick:-
- Go to this site Who Deleted Me .
- Now, Click on Login with Facebook.
- Enter your Facebook Id and Password.
- Now, you will be redirected to a page where you can see all your unfriends.
So, I hope you have enjoyed my article!!!!!
Please do comments on this post!!!!
Keep Visiting!!!!
Read More
1
Well, many users are not aware about Facebook Username feature Provided by Facebook. Well, this trick helps to have a distinct web address to your facebook Profile. Well, this facility gives an attractive URL to your facebook Profile and also provides a URL to your Facebook Profile that can be easily remembered. See below to watch out what facebook actually does when you have a profile username:-
Read More...

Read More
Trick to have a Facebook Username
Read More...
How to have your own Facebook Username???
Follow these steps:-
Please do comments on this post!!!
Keep Visiting!!!
Follow these steps:-
- Login into your Facebook Account.
- First click on Account< Account settings
- Search for the username field and Click on Edit option.
- In the box provided, Type the username of your choice while the facebook server will check that the username is available or not.
- If your username is set and it is available, then click on Save Changes.
Note: Crazy-hacks is going to provide you hacking tricks in this week!! So Keep updated !!!
So,I hope you have enjoyed my article!!!!Please do comments on this post!!!
Keep Visiting!!!
Read More
2
Well, the annoying things about it are that it shows all the people including those who are offline which really sucks as well as now facebook has also added a new annoying object saying that more online friends. While, the old chat interface is more simple to use.
Well, this is a browser trick. And if you are using Firefox, Chrome and Opera, then you can get your old chat interface back by installing a extension/add-on.
The name of this extension is "Sidebar Disabler" which you need to install in tour browser to get back the old chat interface.

So here are the extensions:

So, I hope you will enjoy using the old chat interface.
I hope you have enjoyed my article!!!!
Please do comments on this post!!!
Keep Visiting!!!!
Read More
Get Rid of the New Chat Interface and Switch to the Old One

Hii Friends....I hope you all are fine. Today am again here to post a Facebook Trick. Well, Facebook is the most popular social networking site and is having Alexa Rank 2 all around the world. Well, Facebook has been trying to bring out more and more changes in it to make it look more Professional. But most of the people are annoyed with the new chat interface brought out by facebook. Well, Today am going to tell you how to get rid of this annoying change. And how to switch back to the old chat interface.
Read More...
Read More...
Well, the annoying things about it are that it shows all the people including those who are offline which really sucks as well as now facebook has also added a new annoying object saying that more online friends. While, the old chat interface is more simple to use.
Well, this is a browser trick. And if you are using Firefox, Chrome and Opera, then you can get your old chat interface back by installing a extension/add-on.
The name of this extension is "Sidebar Disabler" which you need to install in tour browser to get back the old chat interface.

So here are the extensions:
- Install "Sidebar Disabler" for Google Chrome from here.
- Install "Sidebar Disabler" for Mozilla Firefox from here.
- Install "Sidebar Disabler" for Opera Mini from here.
So, I hope you will enjoy using the old chat interface.
I hope you have enjoyed my article!!!!
Please do comments on this post!!!
Keep Visiting!!!!
Read More
1
 Hii Friends.....I hope you all are fine.Well, many people update their status to gather other's attention towards their status. Well, If you are looking for such a status update, then you are at the right place. Today am going to tell you that how can you post a Empty status as well as a empty comment and amaze your friends by doing this. Well, This trick is in news from the past days and I forgot to share it with you but this trick is gaining publicity day by day. I also posted about How to post your status with various gadgets without having them. So, I thought to share this latest facebook trick with my Friends and readers. So, the procedure of this latest facebook trick is given below.
Read More...
So, What I mean by blank status update and comment is shown below:

How to post empty status and empty comment on facebook????
So, I made you aware with the most latest trick of facebook.
So, I hope you will enjoy sharing empty status and comments.
Please do comments on this post.
Read More
Latest trick on facebook: Post empty status and comments
Read More...
So, What I mean by blank status update and comment is shown below:
I posted blank status and blank comments in this photo. Well, this will attract most of your friends and they will comment what is this bullshit!!! ha ha !!!
How to post empty status and empty comment on facebook????
- Firstly login into your facebook account.
- Now,go to update status field.
- Now, Keep holding Alt key and type 0173.
- Now release Alt key and click on share post.
- Now!!! Yipee!! You are done.
Note: The same trick would be used to post empty comments that is keep holding Alt key and type 0173 and hit enter this will show a empty comment.
So, I made you aware with the most latest trick of facebook.
So, I hope you will enjoy sharing empty status and comments.
Please do comments on this post.
Keep Visiting.
Read More
0
 Hello Friends...I hope you all are fine. Today am going to post my first article on a Facebook Tricks. Well, you may find a lot of facebook tricks but I would like to update you with one of the best facebook prank. Well, We come across status updates that leave a notice in the end saying that "Updated via Blackberry" or "updated via ipad" and so on. This leaves a kind of strong impression on the reader of that status. By reading this, Anyone can be convinced that you have purchased a ipad,Blackberry,etc. without saying to them that you have purchased such gadgets.
Read More...
Now, You can also also update your status without having such a gadget by using this trick.
Like, see below, I do not have an Blackberry but then also my status will show that I have updated my status via blackberry.

Well, This trick is performed by an facebook application which is itself developed by the facebook developers, which helps us to update our status using any of the gadgets given below without having those gadgets.......You can Update you status using this trick with the following gadgets:-
BlackBerry,BlackBerry torch,BlackBerry Playbook,iPhone,iPhone 4,iPhone 5,iPad ,ipad 2,iPad 3, Android, Calculator.
Now, Firstly login into your Facebook Account.
Now, Select any of the links of your choice with which you want to update your status:-
Read More
Best Prank for Facebook I have ever seen
Read More...
Now, You can also also update your status without having such a gadget by using this trick.
Like, see below, I do not have an Blackberry but then also my status will show that I have updated my status via blackberry.
HOW TO DO THIS?????
Well, This trick is performed by an facebook application which is itself developed by the facebook developers, which helps us to update our status using any of the gadgets given below without having those gadgets.......You can Update you status using this trick with the following gadgets:-
BlackBerry,BlackBerry torch,BlackBerry Playbook,iPhone,iPhone 4,iPhone 5,iPad ,ipad 2,iPad 3, Android, Calculator.
Now, Firstly login into your Facebook Account.
Now, Select any of the links of your choice with which you want to update your status:-
- Update status via BlackBerry
- Update status via BlackBerry Torch
- Update status via BlackBerry Playbook
- Update status via iPhone
- Update status via iPhone 4
- Update status via iPhone 5
- Update status via iPad
- Update status via iPad 2
- Update status via iPad 3
- Update status via Android
 Read More
